Friday, September 30, 2011

Guest Post: Kassi @ Truly Lovely

Today we are honored to have Kassi of Truly Lovely here to share a fun tutorial with us. Kassi, take it away...


Well hello LOVELY Scatter Girls!!! :) 
My name is Kassi and I blog over at a little place called Truly Lovely!
I am THRILLED to be guest posting here today! 

Truly Lovely


Just in time for the chilly fall season,
(well chilly where you are maybe... It's been in the 90s still here in AZ!)
I have a fuzzy, warm, EASY, fleece blanket tutorial to share with you all!!!


Photobucket

The materials needed are:
2 yards of fleece fabric
1 package of coordinating satin blanket binding
Coordinating yarn
Coordinating sewing thread
Pins
Yarn Needle
Scissors
Sewing Machine

Photobucket

In this case I went with zebra fabric and all red coordinating materials.

First trim your fleece fabric of any uneven edges or those funky white labeled edges... You know what I'm talking about... :)

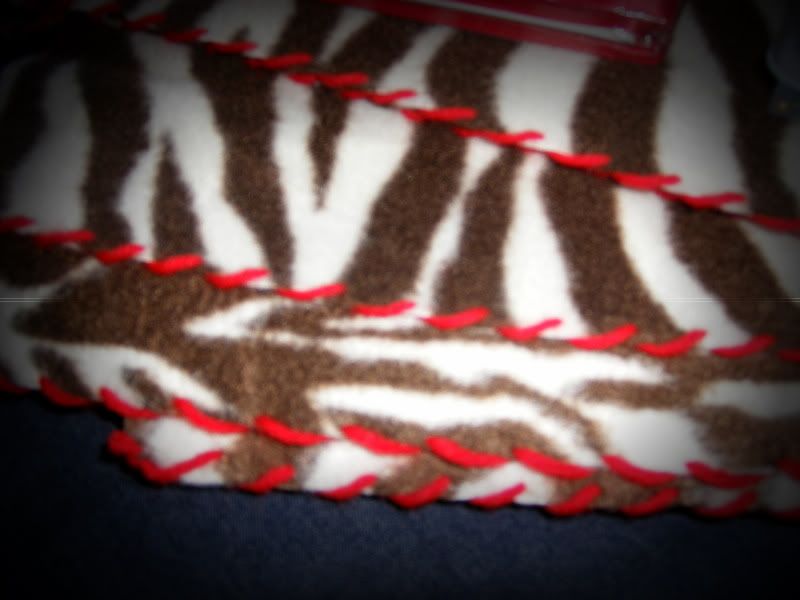
Then, using the Yarn Needle, stitch your thread down the two length sides of your fabric like so... I spaced each stitch about a half an inch apart...

Photobucket


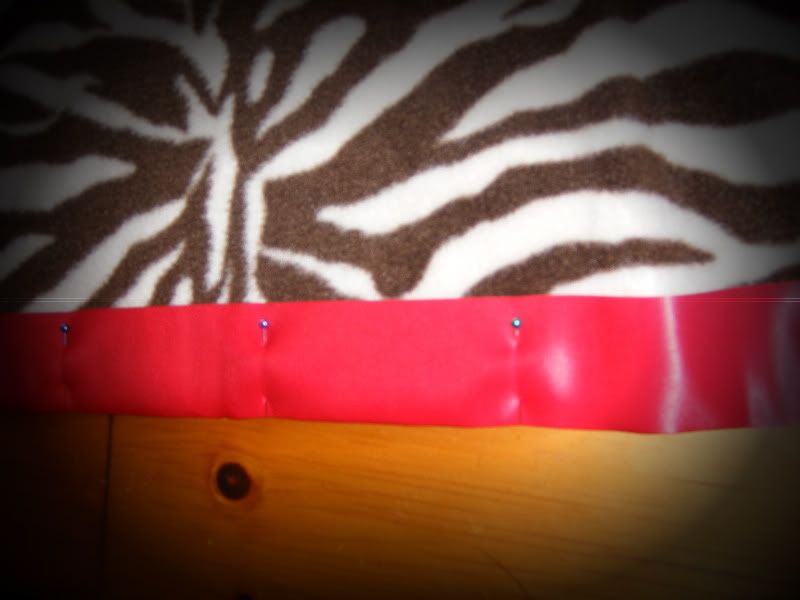
Next you'll pin and trim your satin binding to the two width sides (the two shorter sides)... The binding will have a fold down the middle, simply line that fold up with the edge of your fabric, making sure it's centered so there's an even amount of binding on both sides...

Photobucket


Fold over the edges of the binding to make your four corners and pin those as well. You can either trim or fold the extra binding inside to make your corner.


Photobucket


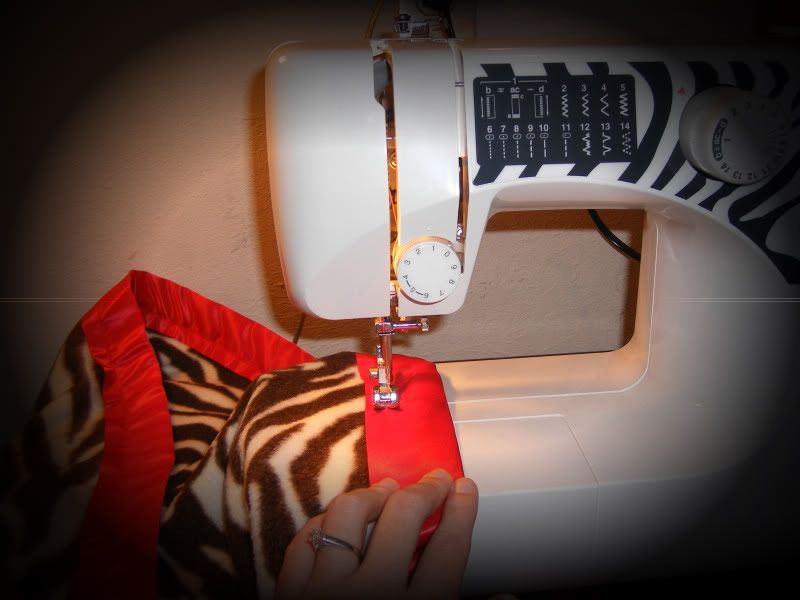
Once you have the binding pinned onto both sides, get out the sewing machine. I used red thread to match the binding...


If you sew really well, you can use a varying color of thread for added pop!!!
I don't so much... SO matching thread hides my inexperienced sewing skills. :)
(I'm a little addicted to zebra print... can you tell?!?)

Photobucket


Simply sew the binding to the fleece pulling pins as you go.


And TaDA!!!! A SUPER EASY fleece blanket made by you!
They make great baby gifts, or gifts for friends or family!! :)
And most especially, GREAT Bridesmaid gifts!!!


Photobucket


See... I made six of these blankets, then each blanket was rolled up and tucked inside a personalized tote for each of my lovely bridesmaids for my wedding in July! 


If you wanna see the tote tutorial, you can pop over here. :) 
THANKS so much to the Scatter Girls for having me over to share with you lovelies today! Hope you'll stop by Truly Lovely to say hello sometime!
Happy crafting dolls!


Thanks Kassi! If you would like to guest post on the Scatter Girls please e-mail us at scattergirls@gmail.com

Tuesday, September 27, 2011

Fall Porch Linky Party


Who doesn't love the season of Fall? Colder weather, Halloween, scarves, hot chocolate, pumpkins, Thanksgiving, the colors, oh how the list could go on and on. I adore everything about Fall, it's my favorite holiday. Growing up I can always remember my Mom, my Sister and working on our front porch to get it perfect for Fall. This week we want to see how you get your front porch, front door, terrace, back porch, or stoop ready for Fall.


Link up your porches and make sure you stop at a few other links to see how everyone else prepares for Fall! 


Friday, September 23, 2011

Scatter Girl of the Month: Alyson of Eisley Rae Clothing

I am so excited to announce that Alyson of Eisley Rae is our Scatter Girl of the Month.
Button up!
Alyson is so friendly and can be found tweeting, blogging, sewing for her shop, playing with her kiddos, and making a nice warm home for her family. Alyson is willing to help others and I have seen her do so several times by answering questions on twitter, volunteering to guest post for others, or just lifting someone up by a nice comment after a tough day.

Alyson is a crafty girl. Fun-loving and warm. We are so pleased that you are a member of the Scatter Girls community and are honored to have you as our Scatter Girl of the Month.
Alyson will get one of these for her craft room courtesy of Bubblewrapp'd


Do you know somebody who would make a great Scatter Girl of the month?
Email us: scattergirls at gmail dot com


Wednesday, September 21, 2011

Guest Post: Creative A Day

Today the Scatter Girls would like to introduce you to the insanely talented Camara of Creative A Day...


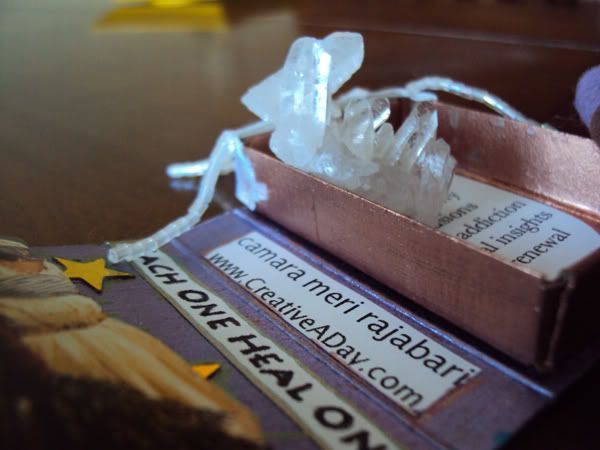
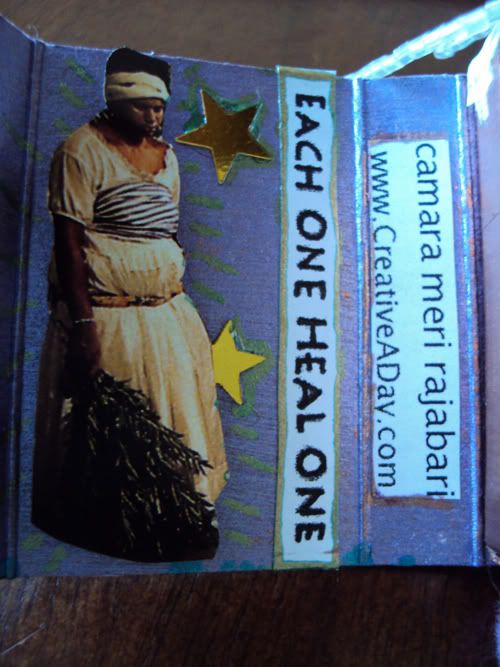
I am Camara Meri Rajabari the artist behind the blog www.CreativeADay.com. My arts & crafts blog focuses on recycling materials I already have in my home studio into unique works of art! I tend to go through a lot of phases and the latest is creating 3 dimensional miniature works.


 One day I grabbed a box of matches to light a candle and I saw that the manufacture's glue on the matchbox had come apart and it sparked an idea to open up a matchbox and create a tiny installation.


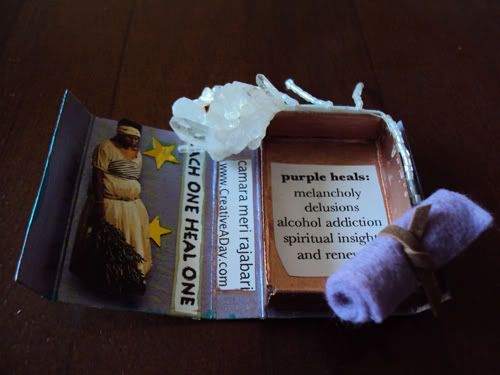
 I am completely fascinated with indigenous/ethnic arts and new age spiritual practices. I thought I would create a prototype of a 3-dimensional 'portable healers first-aid box'. The box contains a healing color swatch and a healing crystal gemstone. According to color therapy, focusing or visualizing on the color purple helps to heal melancholy, delusions, alcohol addiction AND it helps to bring spiritual insights with renewal. The quartz gemstone is great for general healing simply by placing it in one's hands.


 The little healer's box contains the healing properties and an affirmation "Each One, Heal One". I even made a pop-up of an indigenous healer from the Caribbean Islands.


Here are some general instructions: 
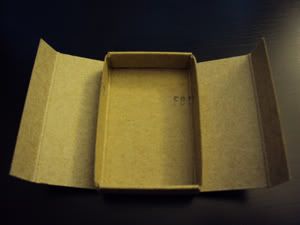
 1. Take a box of matches and gently open the seal along the side of the box.
 2. Once you have the box of matches apart - empty out the matches for later use.
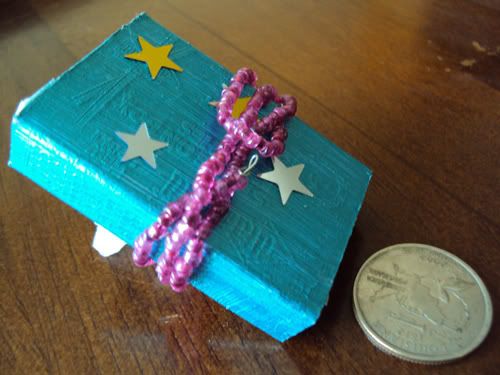
 3. Paint the outside of the cardboard wrapper and the little cardboard 'drawer'. Let them both dry well.
 4. Look in National Geographics for cool pictures. You can have any theme you desire. Maybe you could make a miniature book of wild animals.
 5. I create pop-ups by cutting small squares of regular household sponge and glueing them to the back of my pictures. 
6. I also accent the edges of the paper with glitter gel pens. 
7. I use a regular printer to print out affirmations, my artist's info and healing properties. 
8. Use a glue gun to affix the cardboard 'drawer' to one side of the cardboard wrapper. 
9. Once the glue has dried then use rubber cement to affix the text words. 
10. I used a beaded string to hold the box together.

 Have fun! If you try this out -I would love to post your pics on Creative A Day blog! A BIG THANKS to Scatter Girls for the opportunity to guest post!


Thanks Camara for sharing with the Scatter Girls, if you would like to guest post here on the Scatter Girls' blog please e-mail us at scattergirls@gmail.com
Tuesday, September 20, 2011

What's In Your Bag


"It's just a little bag, but we feel naked in public without it"- Carrie Bradshaw ("Sex and the City")

For a woman a purse is everything... whether we are carrying a large hobo sized bag or a small clutch we're carrying important things. You can tell quite a lot about a lady based on what is in her bag. Today we want you to open up your bags up to your blog readers and to us, show us what you carry in your bag. Do you carry gum, a cell phone, lipstick, a wallet, a camera, snacks, diapers?


Thursday, September 15, 2011

Cooking with Books- Guest Post

Hello Scatter Girls! Today we've got a very talented baker on our hands to teach us a thing or two about some great utensils to have in the kitchen. Miss. Nelly of Cooking With Books... take it away!


Hello Scatter Girls! I am so glad to be guest posting over here for the first time. I've known Lauren via Twitter for a while now and although we haven't met "in real life", I feel she's become one of my favorite tweeps! My name is Nelly and I blog over at Cooking with Books, where I develop recipes, create and cook from books and normally just have fun with whatever is happening in the food world! One thing I love is kitchen tools. Not gadgets in particular, but just fundamental tools that make my life in the kitchen a little happier. Today I'll be sharing a few!

There are thousands of kitchen tools out there and by no means will you ever find a perfect list of kitchen tools you need. Each list is created by the baker or cook and owner of that kitchen, but as a professional baker that cooks at home, I can recommend a few tools that, as simple as they seem, can make your kitchen jobs easier, faster and more enjoyable.

#1: Rubber Spatulas
They seem so basic, but yet they will always be there for you; to scrap, fold, stir or mix anything you've baked or cooked. Spatulas also come in heat-resistant options, which are great to have when you are cooking on the stove. My favorite heat-resistant spatula comes from my culinary school and it certainly gets the job done: CIA Masters Collection Heat Resistant Silicone Chef's Spatula

#2: Wire Balloon Whisks 
There are so many sad, depressing whisks out there. The ones that the wires pop off or the handles falls off mid-whipping! For once and for all, just get a great whisk that will last you a few good years! Whisks aren't only for whipping cream into submission, but they are great for emulsifying salad dressings, making sauces on the stove, as well as aerating dry ingredients in baking. A whisk I love? This Professional Stainless Steel Balloon Whisk, 12" is one of my favorites.

#3: Digital Scale
The New York Times just wrote a piece on the importance of scales and still some people don't give in. A digital scale will help achieve consistent products, each and every time. Did you know that a cup of flour, scooped by two different people, could vary by 2 ounces each way? Weighing your ingredients when baking will also make you a more precise baker, making you aware of each and every product going into your recipe. A great brand to check out for scales is Escali!

#4: Microplane
Although not essential to your kitchen, Microplane tools are just plain cool! They started out as tools for woodworking and evolved into kitchen tools, which gives them a history of being VERY sharp. Scraping your fingers with a microplane shaver is NOT a happy moment, so be careful when handling them. They'll make zesting citrus a breeze and you'll be able to shave airy, fluffy cheese into your pastas and sauces.

And that's it for today Scatter Girls! 
Hoping to see your around Cooking with Books soon! Thanks for reading!


Where you can find Nella:

Tuesday, September 13, 2011

Who's Your Hero


We've all got that someone (or someones) that really inspire us and motive us. We've all got our hero. Who is your hero? Who is that person that can do no wrong in your eyes? This is indestructible to you? Today we want to know who is your hero. 


Is your Mom your hero? Is it your Dad? Your Grandpa? Your Grandmother? Your dog? Your cat? Let us know! Link up your posts and tell us who your hero is! 


Tuesday, September 6, 2011

Self-Portrait Link Up


Today we want to see YOU! We want you to get out your camera and take a picture (or better yet pictures) of yourself, that's right...I know it may feel goofy and silly but we want to see it. Sometimes we get so caught up with blogging that we almost forgot to let everyone see a little bit of who we are. We've linked up are "About Me" pages a few weeks ago and now let us take it a step further and see what you look like :) Let loose and show us a new side to the person behind the blogger. This link up is a bit of a challenge but we can't wait to see what you come up with! This link up party will be up until Tuesday, September 13 so you've got some time to snap your pictures and show us the beauty that is YOU!